
Origami Tunku Tunku is made from three pieces, folded separately and then joined: an “Earth” of layered blue and green paper, a yellow “legs” piece, and a pink “heart face”. All you need is four sheets of 15cm origami paper and a pair of scissors. If you have folded a paper crane before, the Earth and the legs will look familiar partway through.
The origami design for Tunku Tunku, the official mascot of GREEN×EXPO 2027 (the Yokohama Green Expo), was created by a fan from Yokohama who now lives in Osaka and posts as “半日族_万博ありがとう親娘”. According to Kanagawa Prefecture’s announcement of 28 April 2026, she was 20 years old when Expo 2025 Osaka, Kansai got her interested in world expos, and she designed the figure and posted it on social media. The prefecture now supports the design as the “Origami Tunku Tunku Project”, and appointed her a GREEN×EXPO 2027 supporter at the same time. The prefecture’s official channel, Kana-chan TV, published four folding videos on 20 April, and the prefecture’s page also carries a photo-illustrated folding diagram.
The diagrams below take all 38 steps one by one, based on the official videos and the prefecture’s diagram. The time in each step’s heading, something like “from 0:30”, links to the point in the video where that step begins (YouTube opens right at that moment). Watching the hand movements on video is the fastest way to follow origami, faster than photos, so jump to that time whenever you are unsure. In the diagrams, dotted lines are fold lines, red arrows show which way to move the paper, and red dotted lines mark where to cut with scissors.
The diagrams below are our own drawings of the paper shapes, and the small captions printed inside them are in Japanese. Each step in this article gives the full instruction in English underneath its diagram, so you do not need to read the image text, but here is a short glossary for the words that come up again and again.
| Japanese | English |
|---|---|
| 地球 | Earth |
| あし | Legs |
| 顔 / ハートの顔 | Heart face |
| 折り目 | crease |
| 折り線 | fold line |
| 裏返す | turn over |
| 切り込み | cut |
| 真ん中 | center |
| 完成 | finished |
| 用意するもの | What you need |
What you need
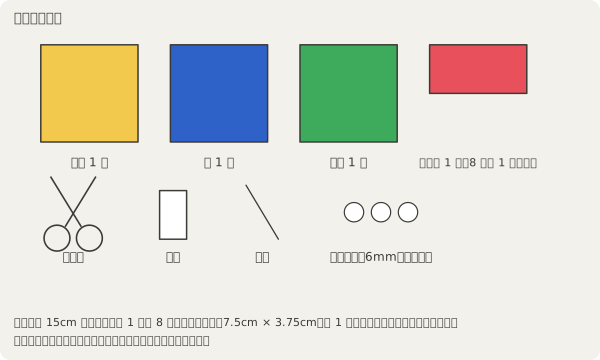
| Item | Quantity | Used for |
|---|---|---|
| Origami paper, yellow (15cm square) | 1 sheet | Legs |
| Origami paper, blue (15cm square) | 1 sheet | Earth |
| Origami paper, green (15cm square) | 1 sheet | Earth |
| Origami paper, pink (cut to an eighth) | 1 sheet | Heart face |
| Scissors | 1 | Cuts for the Earth and heart face |
| Glue | Helpful to have | Assembly |
| Pen | Helpful to have | Eyes and mouth |
| Round stickers, 6mm (white, blue, pink, yellow) | Helpful to have | Eyes and decoration |
The materials follow the prefecture’s diagram, “How to Fold Tunku Tunku”. The pink “eighth” is a 7.5cm by 3.75cm rectangle, made by cutting a 15cm square in half three times. The video uses paper larger than the real size to make the folds easier to see. If you do not have white round stickers, the diagram notes that you can colour plain white stickers instead.
The four official folding videos
Kanagawa Prefecture’s official YouTube channel, Kana-chan TV (Kanagawa Prefecture Official), published four videos on 20 April 2026: a full version and one for each of the three pieces. All of them show the hands from above, with captions describing each fold. They are also linked from the prefecture’s “Origami Tunku Tunku” page.
| Video | Length | Content |
|---|---|---|
| Make Origami Tunku Tunku - folding video | 16:10 | Full version, for anyone who wants to watch all three pieces straight through |
| Make Origami Tunku Tunku - folding video, the Earth | 5:51 | The Earth, folded from the blue and green sheets. Uses scissors |
| Make Origami Tunku Tunku - folding video, the legs | 5:40 | The legs, folded from the single yellow sheet. The first half matches a paper crane |
| Make Origami Tunku Tunku - folding video, the heart face | 4:45 | The face, folded from the eighth-size paper. Uses scissors and round stickers |
The times given for each step in this article point to the three piece-by-piece videos. Those three are embedded at the start of each piece’s folding section below. The video’s own description also suggests splitting the pieces among family or friends to make one figure together.
How to fold it
The steps run in this order: the Earth, the legs, the heart face, and then putting the three pieces together. You can fold them in any order, so jump to the piece you are working on. Each piece ends with a link to the next one.
The Earth (13 steps, 5:51 video)
Fold the blue and green sheets together as one. You use scissors once partway through.
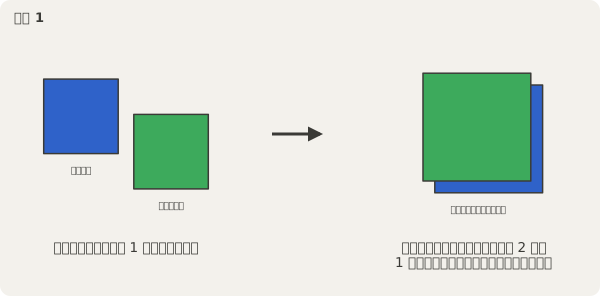
1. Stack them with the white sides together (from 0:30)
Stack the blue and green paper with the white sides facing each other, so the two sheets behave like a single double-sided sheet, green on the front and blue on the back. From here on, treat the two sheets as one.
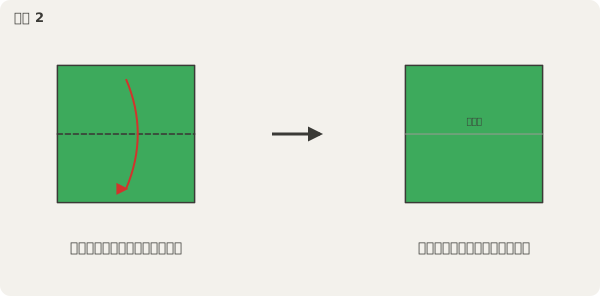
2. Fold in half and crease it (from 0:40)
Fold it in half with the blue side inside, then unfold. One crease remains down the middle.
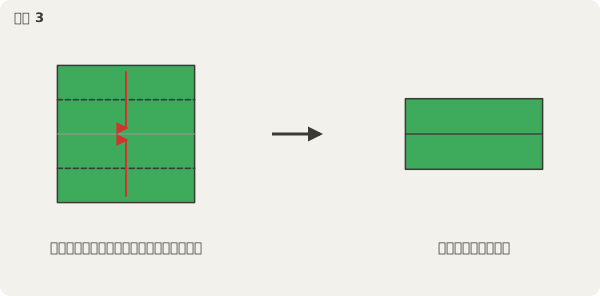
3. Fold the top and bottom edges to the center crease (from 0:50)
Fold the top edge and the bottom edge in to meet the center crease. It becomes a long, narrow rectangle.
4. Fold the sides in too, to make a small square (from 1:05)
Fold the rectangle in half left to right, unfold, and crease it. Then fold the left and right edges in to meet that crease. It becomes a small square.
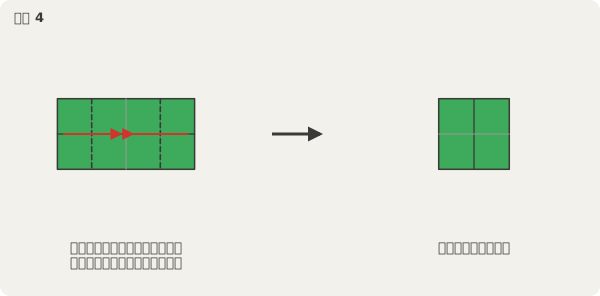
5. Open one pocket and fold it flat to the inner edge (from 1:30)
Open the pocket on the right side and flatten it so the edge lines up with the fold tucked inside. Do the same on the left. It becomes a tall hexagon, boat-shaped. For this step, watching the video from 1:30 to 2:07 is the surest way to follow the hand movements.
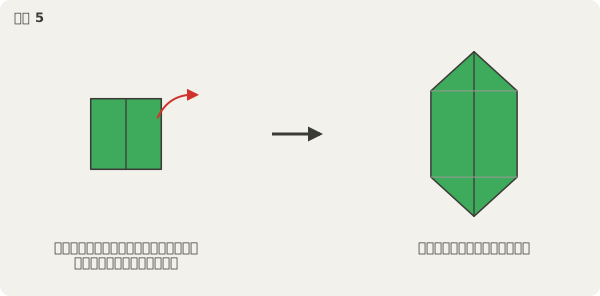
6. Open and flatten all four points (from 2:15)
Fold each pointed tip of the hexagon upward from its crease, then open it and flatten it. Do this at all four points, and it becomes a pinwheel-shaped square.
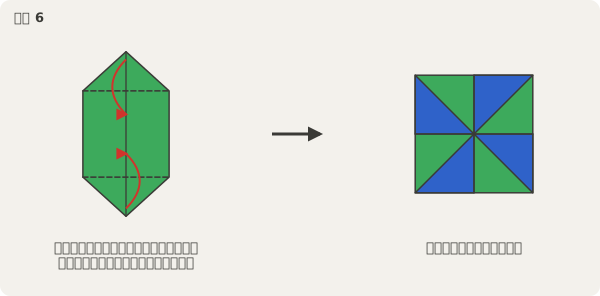
7. Fold just one of the four corners to the center (from 2:59)
Fold just one of the four corners in toward the center. Leave the other three as they are.
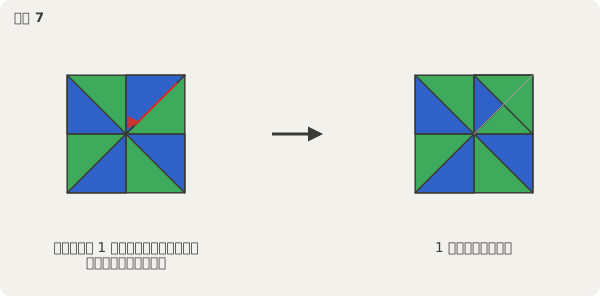
8. Open and flatten each pocket (from 3:09)
Open each of the four pockets in turn and flatten it. You get a 2x2 grid of squares with a blue diamond showing in the middle.
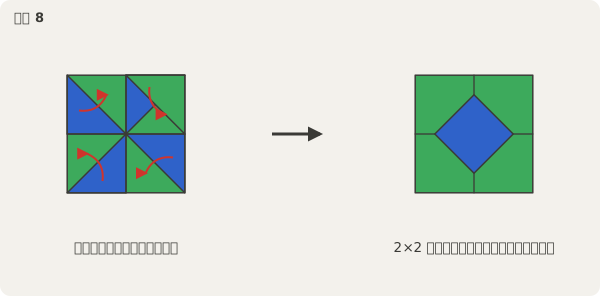
9. Fold the top-left square up from the inside (from 3:29)
Fold the top-left square you just flattened upward in half from the inside. A blue triangle appears in the top-left.
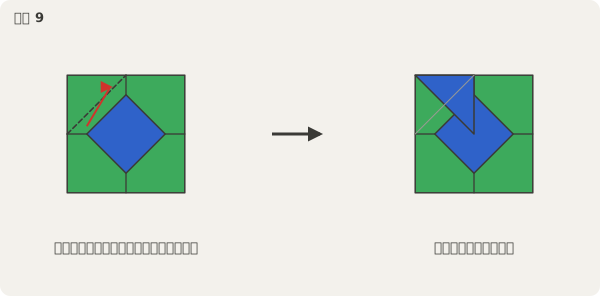
10. Cut with scissors, then do the same on the back (from 3:39)
Cut into the top-right square with scissors, from the inside, to about half its depth. Turn the paper over and make the same cut in the same place on the other side. Stop each cut at about halfway.
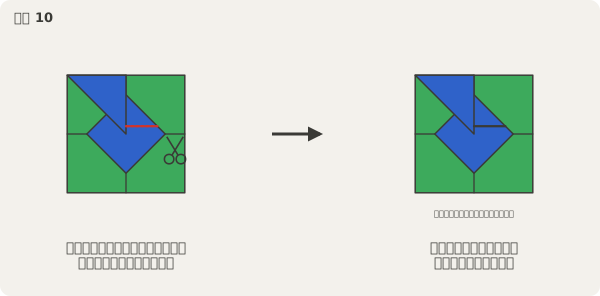
11. Fold the two cut faces in from the center (from 4:05)
Fold the two cut faces inward from the center. Do the same on the back. More blue shows.
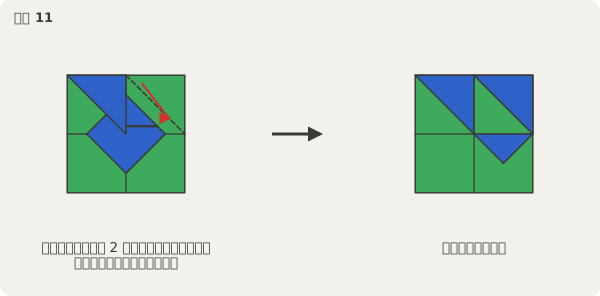
12. Fold the cut section in further (from 4:35)
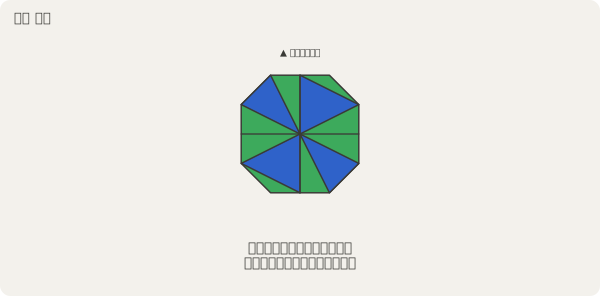
Fold the cut section further inward, and do the same on the back. Blue triangles line up like a pinwheel on the front.
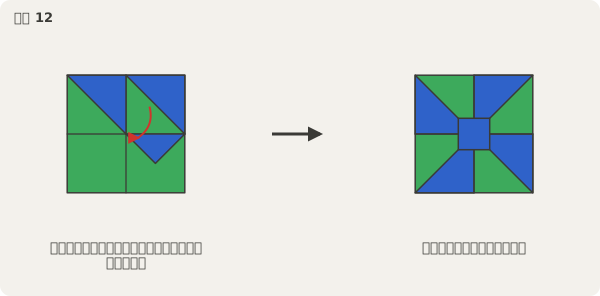
13. Turn it over and fold the four corners (from 4:59)
Turn the paper over and fold in all four corners to round it off. The video says you can secure the folded corners with glue or tape.
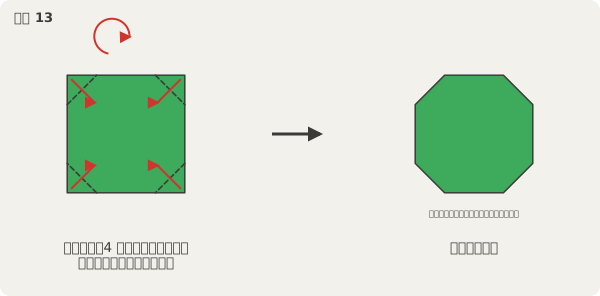
Turn it back over and the Earth piece is done. The video marks which side is up at 5:25, so check that when you assemble the pieces.
Next: the legs.
The legs (12 steps, 5:40 video)
Fold this from a single sheet of yellow paper. The video notes that it starts the same way as a paper crane, and steps 1 through 6 match the crane’s base form.
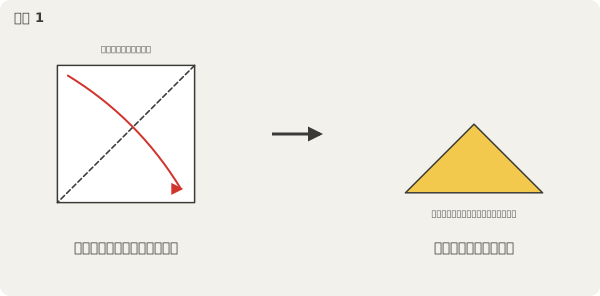
1. Fold it into a triangle (from 0:30)
With the white side up, fold corner to corner into a triangle. You get a triangle with yellow on the outside.
2. Fold into a triangle again (from 0:40)
Fold the corners of the triangle’s base together to make a smaller triangle.
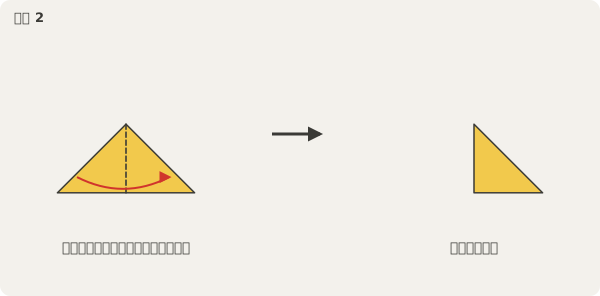
3. Reach inside and open it into a square (from 0:50)
Reach inside the triangle, open it into a square shape, and flatten it. Do the same on the back and it becomes a square. Hold it with the opening, the pocket side, facing down.
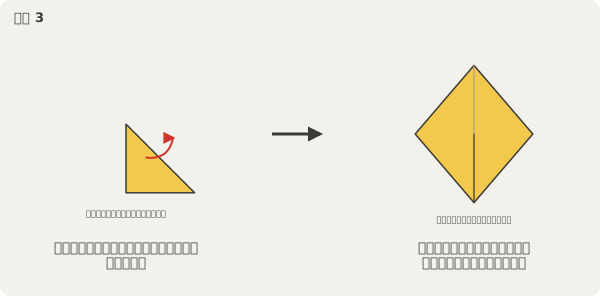
4. Fold both bottom edges to the center (from 1:10)
Fold both bottom edges in toward the center line. Do the same on the back. The video warns that this crease matters later, so press it in firmly.
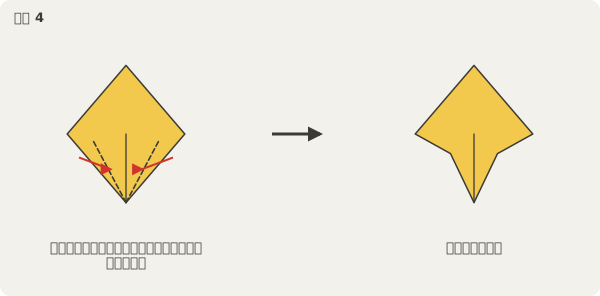
5. Fold the top triangle down and crease it (from 1:30)
Fold the top triangle down along the lower edge of the part you just folded, crease it, then unfold.
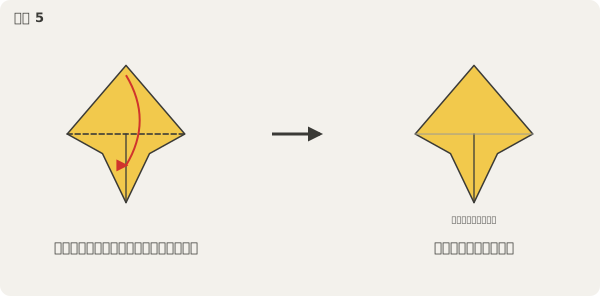
6. Lift the bottom layer, open it and fold it flat (from 1:40)
Lift one layer of the bottom corner, open it from the inside as well, and fold it flat along the crease. Do the same on the back. This gives you the crane’s base form, a long diamond split into two points at the bottom.
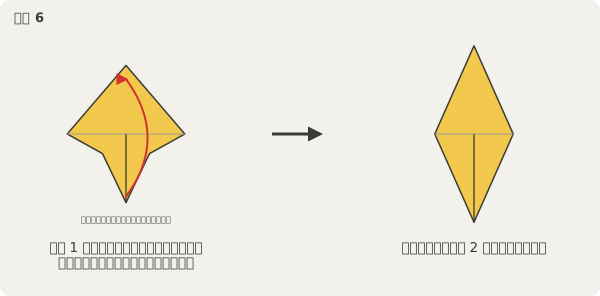
7. Fold the split edges in to the center (from 2:35)
Fold the split edges, which will become the legs, in to meet the center line. Do the same on the other side. The bottom becomes narrower.
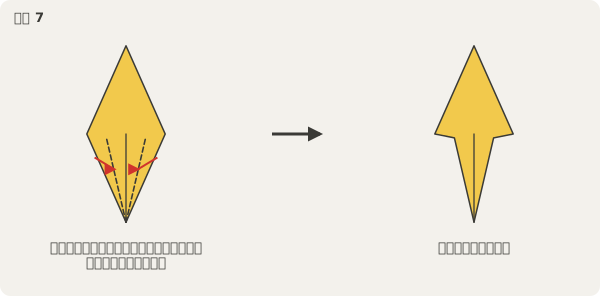
8. Open and refold so the inner edge meets the crease (from 2:50)
Open what you just folded and refold it so the inner edge lines up with the crease. Do the same on the other side, and small foot tips appear on each side.
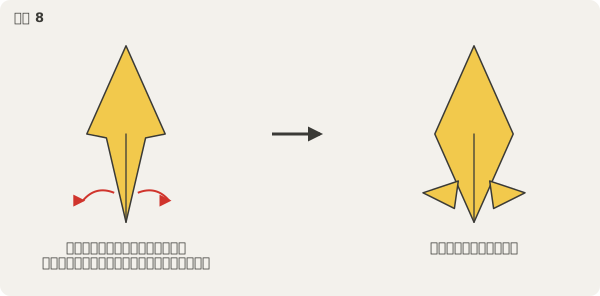
9. Tuck the legs in and pull the foot tips out (from 3:09)
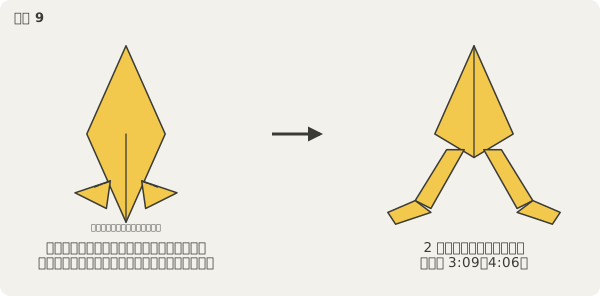
Fold the upper part you just made toward the back. Then open the side, tuck the leg inward along the crease, and pull the foot tip back out. Do the same on the other side, and the two legs open out. This step involves a lot of motion, so it is safest to fold along with the video from 3:09 to 4:06.
10. Fold the foot tips in to square them off (from 4:09)
Fold the tip of each foot inward to square it off. Do the same on the other side.
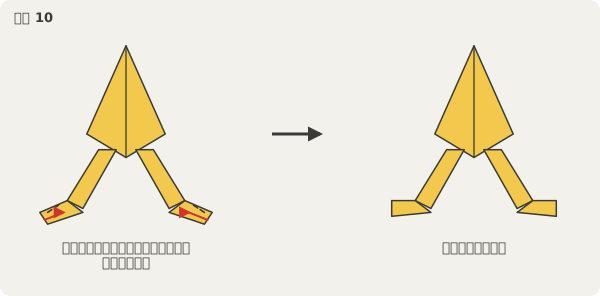
11. Tuck the top corner in (from 4:33)
Fold the top corner down about a third of the way, crease it, and unfold. Open it from the inside and tuck the top part in along the crease. Tuck the back layer in together with it, and the top becomes flat.
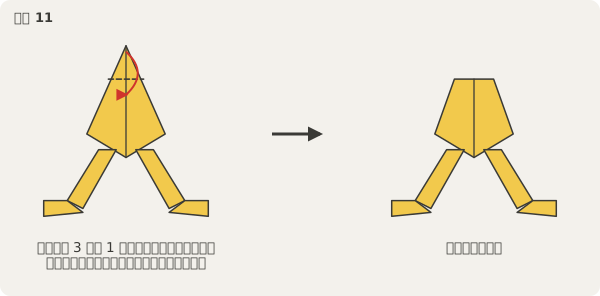
12. Fold in the heels to finish (from 5:00)
Fold both heels inward. Turn it over and press the creases firmly, and the legs piece is done. The prefecture’s diagram notes that you may angle the legs if you like.
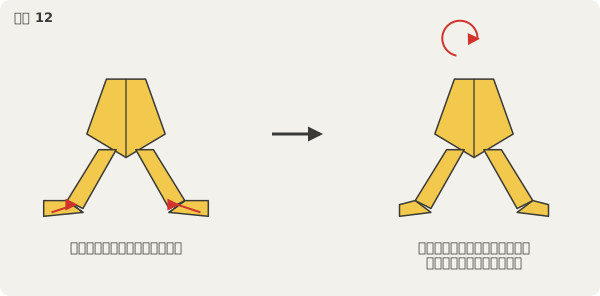
Next: the heart face.
The heart face (13 steps, 4:45 video)
Fold this from the pink rectangle cut to an eighth of a sheet. Because the paper is small, the video demonstrates with a larger sheet. The steps are fiddly, so we recommend watching the video all the way through once before you start folding.
1. Fold the short edges together and crease (from 0:30)
With the white side up, fold the short edges together in half, then unfold. A crease remains down the middle.
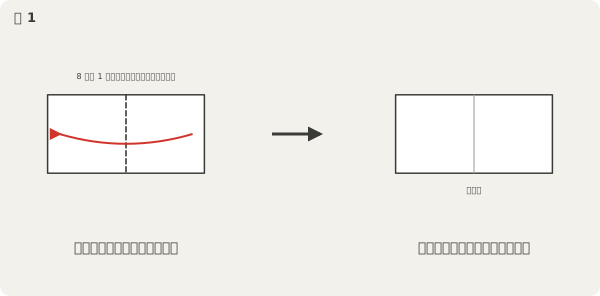
2. Fold the bottom corner up to the crease (from 0:40)
Fold the bottom-right corner up to meet the top of the center crease. Do the same with the bottom-left corner, and you get an upside-down triangle with red showing.
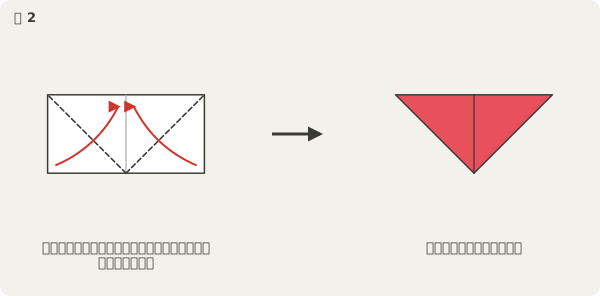
3. Unfold everything, then fold the edge to the crease (from 1:00)
Unfold everything back to the white side, then fold the bottom corner in to meet the diagonal crease. Do the same on the other side, and a red triangle appears on each lower side.
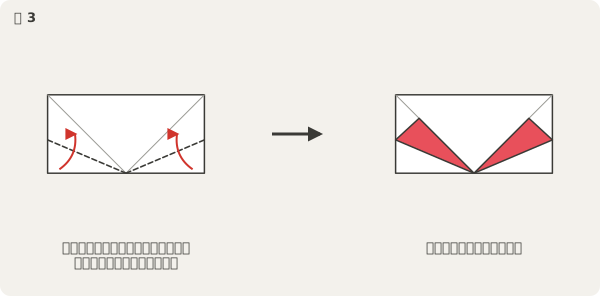
4. Fold it in further (from 1:20)
Fold what you just folded further inward along the diagonal crease. Do the same on the other side. A white triangle remains in the middle of the upside-down triangle.
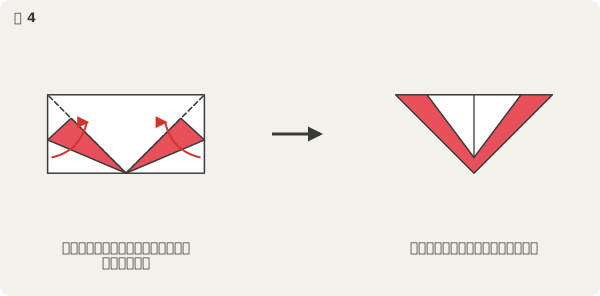
5. Turn it over and fold the corners to the center (from 1:35)
Turn it over and fold the left and right corners in to meet the bottom corner. It becomes a diamond with white showing on the lower half.
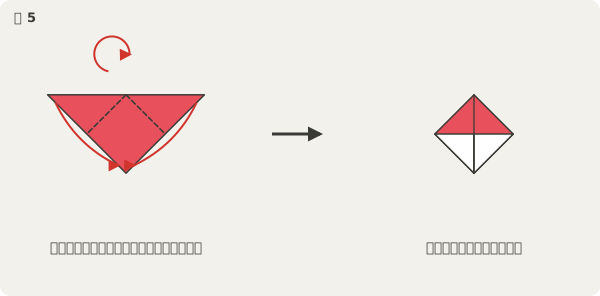
6. Fold from the center out to the edge (from 1:55)
Fold the white part out from the center line to meet the outer edge. Do the same on the other side, and small corners appear on each side.
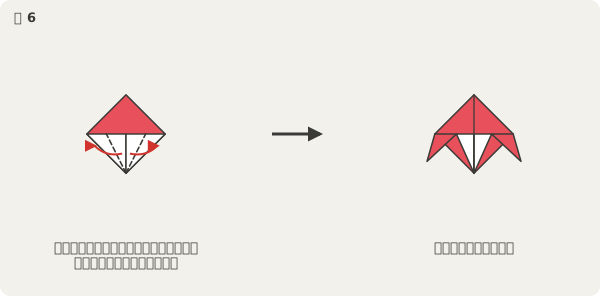
7. Unfold everything and set it in the diagram’s orientation (from 2:15)
Unfold everything you have folded so far, and lay it in the same orientation as the small diagram in the video: a house-shaped pentagon with the point at the top.
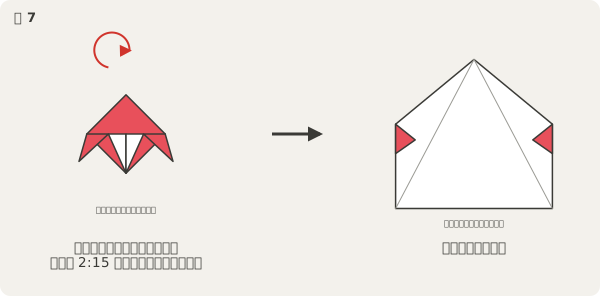
8. Cut diagonally from the crease (from 2:25)
Cut diagonally from the crease with scissors. Make the same cut on the other side. Stop the cut at the crease so you do not cut too far.
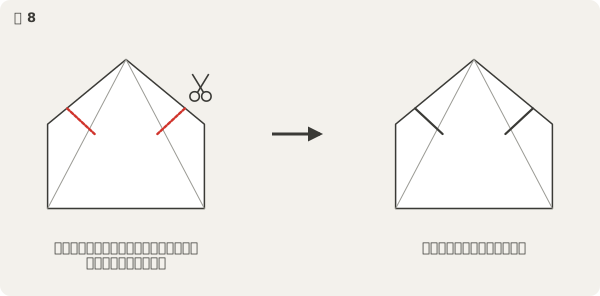
9. Fold the paper’s edge to match the earlier fold (from 2:42)
Fold the edge of the paper to line up with the part you folded earlier. Do the same on the other side, and fold the bottom corner the same way. All four corners turn red, giving a shirt-like shape.
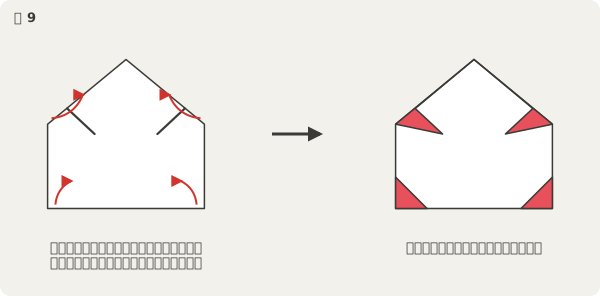
10. Fold that part back together (from 3:02)
Fold the part you just made back along the diagonal crease. Do the same on the other side. It returns to an upside-down triangle.
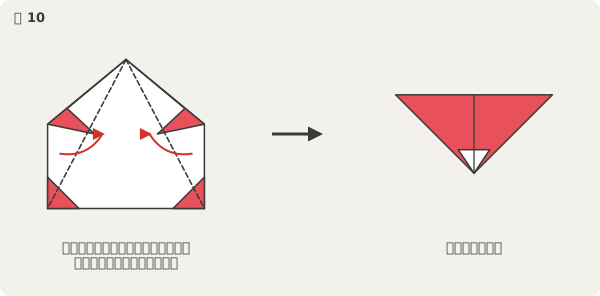
11. Turn it over and fold the edges to the center (from 3:10)
Turn it over and fold the left and right edges in toward the center. A small white triangle shows below the diamond shape. This will become the mouth.
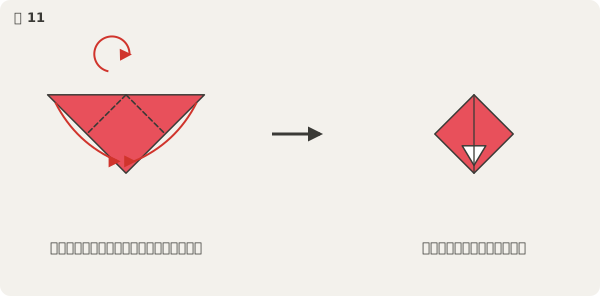
12. Fold the edge to the top, then fold it back out (from 3:24)
Fold the edge up toward the top point, crease it, then fold it back outward along that crease. Do the same on the other side, and small corners appear on each side.
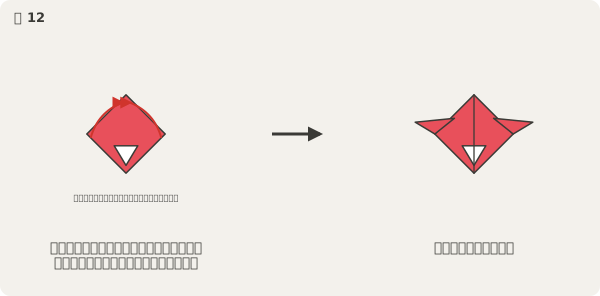
13. Flip it over (from 3:48)
Flip it over, and the folding is done. You get a heart shape with a white notch at the top. To finish, add two small white stickers and draw the eyes and mouth with a pen. Check the finished shape in the video from 3:48 onward, and in the prefecture’s diagram.
Once all three pieces are ready, go to putting the three pieces together.
Putting the three pieces together
The last two panels of the prefecture’s diagram cover assembly.
- Tuck the bottom tip of the heart face into the opening in the middle of the Earth.
- Glue down any parts that are not lying flat.
- Glue the legs piece to the back.
- Add the face and sparkle stickers.
You can see the assembled figure in the last two panels of the prefecture’s diagram, and near the end of the full-version video. We do not show a picture of the finished figure here; check it against the official images and video instead.
Rules for showing what you folded
The origami Tunku Tunku is fan art of the official mascot. Kanagawa Prefecture’s own announcement states that following the GREEN×EXPO Association’s (the Japan Association for the International Horticultural Expo 2027, Yokohama) Fan-Art Guidelines for the Official Mascot Character is required. Here are the main points of the guidelines, in force since 9 July 2025.
- Allowed: individuals making it for non-commercial purposes, and posting photos or videos of what they made on a personal social media account or blog.
- Required: noting that it is fan art when you post it.
- Not allowed: selling it as a product, giving it away even for free, using it in advertising or promotion, suggesting the Association endorses or sponsors it, or making it look like the official mascot itself.
- Companies and incorporated organisations must contact the Association’s licensing desk individually.
The Association does not provide images of the mascot. The diagrams on this site are redrawn by us to show the shape of the paper, and do not depict the finished Tunku Tunku. The videos are embedded through YouTube’s own embedding feature, published by the prefecture; we have not extracted or edited any footage.
Write a wish on your Tunku Tunku, to be displayed at the Kanagawa Pavilion
Kanagawa Prefecture announced an origami Tunku Tunku workshop for the “GREEN×EXPO 2027 Six Months to Go Commemorative Event in Kanagawa” (10am to 5pm, free admission, no booking needed) at Dinacity West in Odawara (208 Nakazato, Odawara) on Wednesday 23 September 2026, a public holiday. According to the prefecture’s notice of 17 August, a participatory project was to begin on that day: write a message about your dreams or hopes for the future on the origami Tunku Tunku you fold, and the prefecture would use it in future city dressing (decorating the streets), as well as displaying it during the Expo at its own pavilion at the venue, “Vibrant INOCHI Forest Kanagawa Pavilion”.
In its announcement of 28 April, the prefecture had listed plans for a display of completed figures called “a thousand Tunku Tunku” and a video display at the venue. The 23 September project was announced as that idea taking shape, in the form of displaying the figures with wishes written on them at the Kanagawa Pavilion. Whether the project got under way at the Odawara event, and any venues or dates after Odawara, could not be confirmed from the prefecture’s notices as of 19 October.
Our take
Of the three pieces, anyone who can fold a paper crane should manage the Earth and the legs after watching the video once. The heart face is the hard one: 13 fiddly folds on a small piece of paper. We think it is worth practising first on a quarter-size sheet rather than an eighth, learning the shape before moving to the small paper. The video itself demonstrates with a larger sheet too.
If a family splits the work, an adult on the Earth, a child on the legs and whoever is good with their hands on the face seems like a fit. The video’s own description suggests splitting the pieces up as one way to enjoy it. The prefecture also ran a hands-on corner at the 3 May 2026 open day for its prefectural office building, and held origami workshops at its PR booth for Vietnam Festa in Kanagawa on 12 and 13 September. If you are heading to Odawara on 23 September, folding one at home first and learning the shape before you write your wish at the venue leaves more of the limited time on the day for the photo session and other events. Since the figure displayed at the Kanagawa Pavilion is the one you folded and wrote yourself, that is one more reason to go and see it during the Expo.